
Chapter 14: Introduction to Multi-page Apps
Contents
Chapter 14: Introduction to Multi-page Apps
What you will learn
In this chapter we will introduce multi-page apps which will allow us to build more complex apps.
Learning Intentions
Why build multi-page apps
How to structure a multi-page apps project
How to navigate between pages
By the end of this chapter you will know how to build this app:
Click to download the complete code files for this chapter
Why build multi-page apps?
Advantages
Easier to scale our apps by adding smaller individual pages, rather than developing one large app
Easier to troubleshoot bugs
Better Search Engine Optimization because each page can have its own meta tags and rendering content
Usage statistics available for each page allows us to analyze user behavior for separate sections of the app
Disadvantages
Extra code infrastructure is usually required
Single-page apps are more mobile-friendly than multi-page
Slightly more complex to build than single-page apps
Basics of a Multi-page App
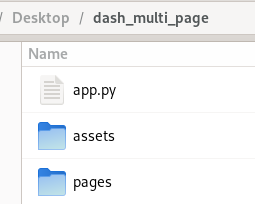
Multi-page apps have a simple structure:
One main file commonly named
app.pyOne sub-folder, named
pages, that contains all of the seperate pages of the appAnother sub-folder called ‘assets’ which will hold the pictures and style sheets our app might use
Let’s start exploring multi-page apps by walking through the first example of Pages in Dash documentation. The complete app can be located here.
First, create a root directory folder called dash_multi_page. Within the dash_multi_page directory create the main file called app.py as well as the /pages and /assets subdirectories:
Next, let’s create the home page for our app. Create home.py in the /pages subdirectory. Notice in the code below that we specify the path with a forward slash when calling dash.register_page(). This will make the home.py page the landing page for our multi-page app.
You might also see that we don’t declare an app object as we normally do in Dash apps - app = Dash(__name__). This is because the app object is declared in the app.py file which we will build shortly.
home.py
import dash
from dash import html, dcc

dash.register_page(__name__, path='/')

layout = html.Div(children=[
    html.H1(children='This is our Home page'),

    html.Div(children='''
        This is our Home page content.
    '''),

])
We’ll create 2 more pages for this basic multi-page app example: analytics.py and archive.py. Notice how thelayout and @callback are written. Unlike single-page Dash apps, which would have app.layout and @app.callback, with multi-page apps, the pages do not use the app object.
analytics.py
import dash
from dash import html, dcc, callback, Input, Output

dash.register_page(__name__)

layout = html.Div(children=[
    html.H1(children='This is our Analytics page'),
	html.Div([
        "Select a city: ",
        dcc.RadioItems(['New York City', 'Montreal','San Francisco'],
        'Montreal',
        id='analytics-input')
    ]),
	html.Br(),
    html.Div(id='analytics-output'),
])


@callback(
    Output(component_id='analytics-output', component_property='children'),
    Input(component_id='analytics-input', component_property='value')
)
def update_city_selected(input_value):
    return f'You selected: {input_value}'
archive.py
import dash
from dash import html, dcc

dash.register_page(__name__)

layout = html.Div(children=[
    html.H1(children='This is our Archive page'),

    html.Div(children='''
        This is our Archive page content.
    '''),

])
Finally, we’ll create the app.py file which incorporates all three pages into the app.
app.py
from dash import Dash, html, dcc
import dash

app = Dash(__name__, use_pages=True)

app.layout = html.Div([
	html.H1('Multi-page app with Dash Pages'),

    html.Div(
        [
            html.Div(
                dcc.Link(
                    f"{page['name']} - {page['path']}", href=page["path"]
                )
            )
            for page in dash.page_registry.values()
        ]
    ),

	dash.page_container
])

if __name__ == '__main__':
	app.run_server(debug=True)
There are several requirements for the app.py file:
use_pages=Truemust be included when creating theappobjectfor page in dash.page_registry.values()will crawl through the/pagesdirectory to find all the names and links of each pagedash.page_containercomponent must be included in theapp.layout. This is where the content of each page will be displayed
More Advanced Multi-Page app
Now let’s create a more advanced multi-page app, building on examples from previous chapters. We’ll also use a dropdown component to navigate between pages instead of the dcc.Link that we used above. The complete app is located here.
First, create the app.py file by using the following code.
App.py
import dash
import dash_bootstrap_components as dbc

app = dash.Dash(__name__, use_pages=True, external_stylesheets=[dbc.themes.BOOTSTRAP])

dropdown =  dbc.DropdownMenu(
        [
            dbc.DropdownMenuItem(page["name"], href=page["path"])
            for page in dash.page_registry.values()
        ],
        nav=True,
        label="More Pages",
        align_end=False,
    )

app.layout = dbc.Container(
    [dropdown, dash.page_container],
    fluid=True,
)

if __name__ == "__main__":
    app.run_server(debug=True)
In this case we are using the Dash Bootstrap DropdownMenu component to create links to the 3 pages. Every page in the for loop will generate a new DropdownMenuItem with the name of the page and a link to it.
Notice the location of the dash.page_container in the layout. This means that the layout content of each page will display right after the dropdownMenu.
Now, let’s create our home page:
Home.py
import dash
from dash import html, dcc

dash.register_page(__name__, path='/')

layout = html.Div(children=[
    html.H1(children='This is our Home page'),

    html.Div(children='''
        This is our Home page content.
    '''),
])
Remeber to include path='/' in the page registry to indicate that this will be your app’s home page.
Next we need to create the other two pages. The first page will be pull an example from Chapter 8. To make this page work with our multi-page example app we need to add dash.register_page(__name__) and remove all references to app because it should only be declared in the main app.py file:
App_8_2_3.py
import dash
from dash import dcc, callback, Input, Output
import plotly.express as px
import dash_bootstrap_components as dbc


dash.register_page(__name__)

# Data
df = px.data.gapminder()

# Page Layout
layout = dbc.Container([
    dcc.Markdown("# Interactive Dash App with Line Chart"),
    dbc.Row([
        dbc.Col([
            dcc.Dropdown(id='country-dropdown',
                         options=[x for x in df.country.unique()],
                         multi=True,
                         value=['Canada', 'Brazil'])
        ], width=8)
    ]),
    dbc.Row([
        dbc.Col([
            dcc.Graph(id='figure1')
        ], width = 8)
    ])
])


# Configure Callback
@callback(
    Output('figure1','figure'),
    Input('country-dropdown', 'value')
)
def udpate_graph(countries_selected):
    df_filtered = df[df.country.isin(countries_selected)]
    fig = px.line(df_filtered, x='year', y='lifeExp', color='country')

    return fig
For our second page we will use the final Chapter 10 code.
App_10.py
# Import packages
from dash import Dash, dash_table, dcc, html, Input, Output, State
import dash_bootstrap_components as dbc
import plotly.express as px

dash.register_page(__name__)

# Setup data
df = px.data.gapminder()
dropdown_list = df['country'].unique()

# Create app components
markdown = dcc.Markdown(id='our-markdown', children='# My first app')
dropdown = dcc.Dropdown(id='our-dropdown', options=dropdown_list, value=dropdown_list[0])
radio = dcc.RadioItems(id='our-radio', options=['line', 'scatter'], value='line')
button = html.Button(id='our-button', children='Update data', n_clicks=0)
data_table = dash_table.DataTable(id='our-data-table', page_size=10)

layout = dbc.Container(
    [
        dbc.Row(dbc.Col(markdown)),
        dbc.Row(
            [
                dbc.Col(dropdown, width=3),
                dbc.Col(radio, width=3),
                dbc.Col(button, width=3)
            ]
        ),
        dbc.Row(dbc.Col(dcc.Graph(id='our-figure'))),
        dbc.Row(dbc.Col(data_table))
    ]
)


# Configure callbacks
@callback(
    Output(component_id='our-figure', component_property='figure'),
    Output(component_id='our-data-table', component_property='data'),
    Input(component_id='our-button', component_property='n_clicks'),
    State(component_id='our-dropdown', component_property='value'),
    State(component_id='our-radio', component_property='value'),
)
def update_graph(n_clicks, value_dropdown, value_radio):
    if n_clicks >= 0:
        df_sub = df[df['country'].isin([value_dropdown])]
        data = df_sub.to_dict('records')

        if value_radio == 'scatter':
            fig = px.scatter(
                df_sub,
                x='year',
                y='lifeExp',
                color='country',
                symbol='continent',
                title='PX {} plot'.format(value_radio),
                template='plotly_white'
            )
        else:
            fig = px.line(
                df_sub,
                x='year',
                y='lifeExp',
                color='country',
                symbol='continent',
                title='PX {} plot'.format(value_radio),
                template='plotly_white'
            )

    return fig, data
Exercises
(1) Starting from the apps we built in the two exercises from chapter 12, let’s create a multipage app titled “My first multipage App” in which:
“Part 1” is the page dedicated to the Exercise 1. This is also our landing page
“Part 2” is the page dedicated to the section 2
On the app.py file, also create a .div component below the title, containing the links to the two pages (similarly to what’s been presented here). To avoid errors, carefully look at the
idof the different components across both pages: we cannot reuse ids!
See Solution
The app file structure will be:
app.pypagespart1.pypart2.py
Let’s see how each file looks like:
app.py
from dash import Dash, dcc, Output, Input, html, callback
import dash
import pandas as pd
import plotly.express as px
import dash_bootstrap_components as dbc
from datetime import date
import plotly.express as px

app = Dash(__name__, use_pages=True, external_stylesheets=[dbc.themes.BOOTSTRAP], suppress_callback_exceptions=True)

app.layout = html.Div([
	html.H1('My first multipage App'),

    html.Div(
        [
            html.Div(
                dcc.Link(
                    f"{page['name']} - {page['path']}", href=page["path"]
                )
            )
            for page in dash.page_registry.values()
        ]
    ),

	dash.page_container
])

if __name__ == '__main__':
	app.run_server()
part1.py
import dash
from dash import Dash, dcc, Output, Input, callback
import pandas as pd
import plotly.express as px
import dash_bootstrap_components as dbc

# data
df = px.data.gapminder()
df = df.groupby(['year','continent']).agg({'pop':'sum', 'gdpPercap':'mean','lifeExp':'mean'}).reset_index()

# Dash App
dash.register_page(__name__, path='/')

# Create app components
title_ = dcc.Markdown(children='Gapminder Stacked Bar Charts', style={'textAlign': 'center','fontSize': 25}, className='text-dark')
dropdown_ = dcc.Dropdown(id='metric-dropdown', placeholder = 'Select a metric',
                        options= [{'label': 'Population', 'value': 'pop'},
                                {'label': 'GDP per capita', 'value': 'gdpPercap'},
                                {'label': 'Life Expectancy', 'value': 'lifeExp'}])
graph_ = dcc.Graph(id='figure1-1')

# App Layout
layout = dbc.Container(
    [
        dbc.Row(
            [
                dbc.Col([title_], width=12)
            ]),
        dbc.Row(
            [
                dbc.Col([dropdown_],
                        className="p-3",
                        width=2),
                dbc.Col(
                        [
                            graph_
                        ],
                        className="p-3",
                        width=10),
            ],
            className="border-top border-dark border-3 m-1",
            justify="evenly"
        )
    ],
    className="bg-secondary bg-opacity-75 m-0 p-3 bg-gradient",
    fluid=True,
    style={"height": "100vh"},
)

# Callbacks
@callback(
    Output('figure1-1','figure'),
    Input('metric-dropdown', 'value'),
    prevent_initial_call=True
)
def update_markdown(metric_):
    fig = px.bar(df, x='year', y=metric_, color='continent', template='plotly_dark')
    return fig
part2.py
# Import packages
import dash
from dash import Dash, dcc, Input, Output, html, callback
import dash_bootstrap_components as dbc
import pandas as pd
from datetime import date
import plotly.express as px

# Initialise the App
dash.register_page(__name__)

# Import data
dfS = px.data.stocks()
dfS['date'] = pd.to_datetime(dfS['date'], format='%Y-%m-%d')

dfG = px.data.gapminder()
dfG = dfG.groupby(['year','continent']).agg({'pop':'sum', 'gdpPercap':'mean','lifeExp':'mean'}).reset_index()

# Create app components
tab_style = {
    'background-color' : '#800033',
    'fontWeight': 'bold',
    'color' : '#f2f2f2',
    'border': '1px solid #ffe6f0'
}

selected_tab_style = {
    'background-color' : '#800033',
    'fontWeight': 'bold',
    'text-decoration': 'underline',
    'color' : '#f2f2f2',
    'border': '1px solid #ffe6f0'
}

card_style = {
    'padding' : '0px',
    'border' : '0px'
}

title_ = dcc.Markdown(children='Exercise 11.2', style={'textAlign': 'center','fontSize': 20}, className='text-dark')
tabs_ = dcc.Tabs(
            id='tabs-app',
            children=[
                dcc.Tab(label='App One', value='tab-app-1', style=tab_style, selected_style=selected_tab_style),
                dcc.Tab(label='App Two', value='tab-app-2', style=tab_style, selected_style=selected_tab_style)],
            value='tab-app-1'
        )
tabs_content_ = dbc.Container(id='tabs-content', className='p-3')
# Specific for App 1
date_range_ = dcc.DatePickerRange(id='date-range',
    start_date_placeholder_text='start date',
    end_date_placeholder_text='end date',
    min_date_allowed=dfS.date.min(),
    max_date_allowed=dfS.date.max(),
    display_format='DD-MMM-YYYY',
    first_day_of_week = 1)
card_L = dbc.Card([
            dbc.CardBody([
                dcc.Graph(id='my-graph-left'),
        ],
        style = card_style),
    ],
    style = card_style)
card_C = dbc.Card([
            dbc.CardBody([
                dcc.Graph(id='my-graph-center'),
        ],
        style = card_style),
    ],
    style = card_style)
card_R = dbc.Card([
            dbc.CardBody([
                dcc.Graph(id='my-graph-right'),
        ],
        style = card_style),
    ],
    style = card_style)
# Specific for App 2
dropdown_ = dcc.Dropdown(id='metric-dropdown', placeholder = 'Select a metric',
                        options= [{'label': 'Population', 'value': 'pop'},
                                {'label': 'GDP per capita', 'value': 'gdpPercap'},
                                {'label': 'Life Expectancy', 'value': 'lifeExp'}])
graph_ = dcc.Graph(id='figure1-2')

# App layout
layout = dbc.Container(
    [
        dbc.Row(dbc.Col([title_], width = 12)),
        dbc.Row(
            [
                dbc.Col([
                        tabs_,
                        tabs_content_
                ],
                width = 12)
            ]
        )
    ],
    className="bg-danger bg-opacity-75 m-0 p-3 bg-gradient",
    fluid=True,
    style={"height": "100vh"},
)

# Callbacks
@callback(
    Output('tabs-content', 'children'),
    Input('tabs-app', 'value'),
    suppress_callback_exceptions=True)
def render_content(tab):
    if tab == 'tab-app-1':
        app1_layout = dbc.Container(
            [
                dbc.Row(dbc.Col([date_range_], width = 12, style={'textAlign': 'center'})),
                dbc.Row([
                    dbc.Col([card_L], width = 4),
                    dbc.Col([card_C], width = 4),
                    dbc.Col([card_R], width = 4)
                ],
                className = 'p-4'),
            ]
        )
        return app1_layout

    elif tab == 'tab-app-2':
        # App 2 layout
        app2_layout = dbc.Container(
            [
                dbc.Row(
                    [
                        dbc.Col([dropdown_], width=2),
                        dbc.Col([graph_], width=10),
                    ]
                )
            ]
        )
        return app2_layout

# Callback for App1
@callback(
    Output('my-graph-left','figure'),
    Output('my-graph-center','figure'),
    Output('my-graph-right','figure'),
    Input(component_id='date-range', component_property='start_date'),
    Input(component_id='date-range', component_property='end_date')
)
def plot_dt(start_date, end_date):
    figL = px.line(dfS, x='date', y=['GOOG','AAPL'], template = 'plotly_dark')
    figC = figL
    figR = figC
    if start_date is not None:
        figL = px.line(dfS.loc[dfS['date']<start_date, :], x='date', y=['GOOG','AAPL'], template = 'plotly_dark')
        if end_date is not None:
            figC = px.line(dfS.loc[(dfS['date']>=start_date) & (dfS['date']<=end_date), :], x='date', y=['GOOG','AAPL'], template = 'plotly_dark')
    if end_date is not None:
        figR = px.line(dfS.loc[dfS['date']>end_date, :], x='date', y=['GOOG','AAPL'], template = 'plotly_dark')

    return figL, figC, figR

# Callback for App2
@callback(
    Output('figure1-2','figure'),
    Input('metric-dropdown', 'value'),
    prevent_initial_call=True
)
def update_markdown(metric_):
    fig = px.bar(dfG, x='year', y=metric_, color='continent', template='plotly_dark')
    return fig
(2) Starting from the app we built in exercise 1, let’s improve the app.py file. As you saw, the top part of the app doesn’t look nice, let’s make the following improvements:
Create a dropdown menu with the link to each page. The dropdown should be on the top right of our app, below the title.
Modify the background of the whole top section to a dark color with a bright app title in the center
See Solution
The new app.py file will be the following: (the remaining files are the same as in the solution to exercise 1)
from dash import Dash, dcc, Output, Input, html, callback
import dash
import pandas as pd
import plotly.express as px
import dash_bootstrap_components as dbc
from datetime import date
import plotly.express as px

app = Dash(__name__, use_pages=True, external_stylesheets=[dbc.themes.BOOTSTRAP], suppress_callback_exceptions=True)

dropdown_ =  dbc.DropdownMenu(
        [
            dbc.DropdownMenuItem(page["name"], href=page["path"])
            for page in dash.page_registry.values()
        ],
        nav=True,
        label="Show Pages",
        align_end=False,
    )

app.layout = dbc.Container([
	dbc.Row([
		html.H1('My first multipage App', style={'textAlign': 'center','fontSize': 25}, className='text-light'),
	]),
	dbc.Row([
		dbc.Col([html.Div()], width=11),
		dbc.Col([dropdown_], width=1)
	]),
	dash.page_container
],
fluid = True,
className = 'bg-dark')

if __name__ == '__main__':
	app.run_server()
Summary
In this chapter, we have gone over the advantages of a multi-page app compared to a single-page app. We have learned to structure a multi-page app and understood what features differ from a single-page app.
In the next chapter, we will dive into the page registry and review more customizations features, which will take your multi-page app to the next level.