
Chapter 3: Dash Components and Layouts
Contents
Chapter 3: Dash Components and Layouts
What you will learn
In this chapter we will introduce you to the Dash Core and HTML components which are used to create rich app interfaces. These include the dropdown, the checklist, the button, and many more. We will also show you how to use Dash Bootstrap Components to design the layout of your app.
Learning Intentions
Dash Core Components
Dash HTML Components
Desgining an App Layout
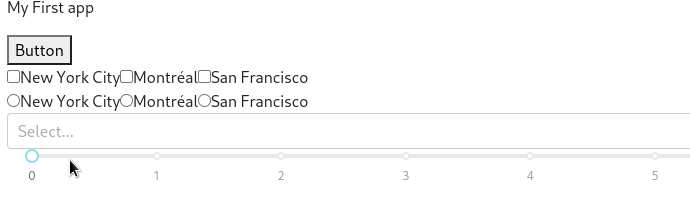
By the end of this chapter you will know how to build this app:
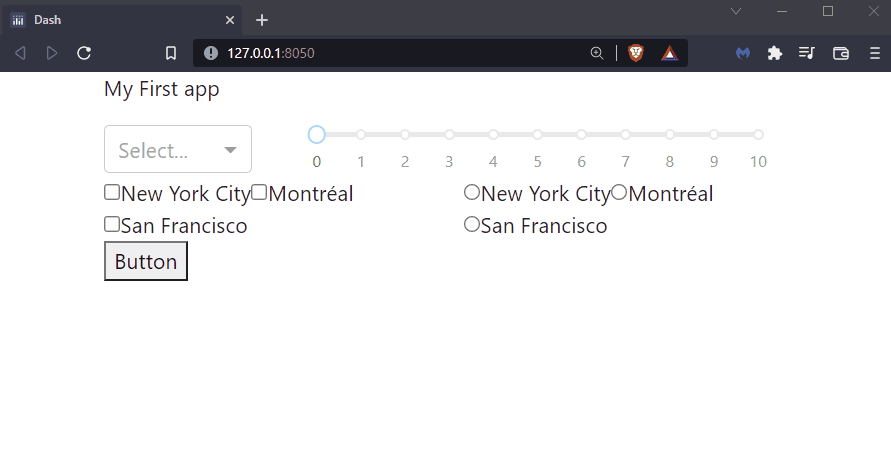
See Code
# Import packages
from dash import Dash, html, dcc
import dash_bootstrap_components as dbc

# Initialise the App
app = Dash(__name__, external_stylesheets=[dbc.themes.BOOTSTRAP])

# Create app components
markdown = dcc.Markdown(children='My First app')
button = html.Button(children="Button")
checklist = dcc.Checklist(options=['New York City', 'Montréal', 'San Francisco'])
radio = dcc.RadioItems(options=['New York City', 'Montréal', 'San Francisco'])
dropdown = dcc.Dropdown(options=['NYC', 'MTL', 'SF'])
slider = dcc.Slider(min=0, max=10, step=1)

# App Layout
app.layout = dbc.Container(
    [
        dbc.Row([dbc.Col([markdown], width=8)]),
        dbc.Row(
            [
                dbc.Col([dropdown], width = 3),
                dbc.Col([slider], width = 9),
            ]
        ),
        dbc.Row(
            [
                dbc.Col([checklist], width = 6),
                dbc.Col([radio], width = 6),
            ]
        ),
        dbc.Row([dbc.Col([button], width = 11)]),
    ]
)

# Run the App
if __name__ == '__main__':
    app.run_server()
3.1 Dash Components
Components are the building blocks of a Dash app. In this chapter, we will learn about a few common and useful components: Button, Checklist, RadioItems, Dropdown, and Slider. Check the Dash documentation for a full list of Core components and HTML components.
Properties are attributes of components, such as an id or children, which allow us to fully build the component.
Buttons
Buttons are clickable components that will be used to trigger other actions such as submitting a form or plotting data. We will pass the children property to give the button a name.
# Import packages
from dash import Dash, html, dcc
import dash_bootstrap_components as dbc
# Initialise the App
app = Dash(__name__, external_stylesheets=[dbc.themes.BOOTSTRAP])
# Create app components
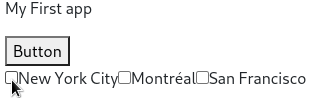
markdown = dcc.Markdown(children='My First app')
button = html.Button(children="Button")
# App Layout
app.layout = dbc.Container([
markdown,
button,
])
# Run the App
if __name__ == '__main__':
app.run_server()

Checklist
Checklists display a set of options for the user to choose. We will pass in a list of options when we create the checklist component below:
# Import packages
from dash import Dash, html, dcc
import dash_bootstrap_components as dbc

# Initialise the App
app = Dash(__name__, external_stylesheets=[dbc.themes.BOOTSTRAP])

# Create app components
markdown = dcc.Markdown(children='My First app')
button = html.Button(children="Button")
checklist = dcc.Checklist(options=['New York City', 'Montréal', 'San Francisco'])

# App Layout
app.layout = dbc.Container([
    markdown,
    button,
    checklist,
])

# Run the App
if __name__ == '__main__':
    app.run_server()
Radio items
Radio items are lists of options from which the user can select only one option. Adding too many radio items may crowd your data visualization and it can also confuse your user with too many options. Having too few radio items may mean that you do not need them in the first place. Radio items are suitable when you want your user to select only one of the options. Whereas a checklist can include multiple choice options for the user to select.
Similar to the checklist, we will pass in a list of options when creating the component.
# Import packages
from dash import Dash, html, dcc
import dash_bootstrap_components as dbc
# Initialise the App
app = Dash(__name__, external_stylesheets=[dbc.themes.BOOTSTRAP])
# Create app components
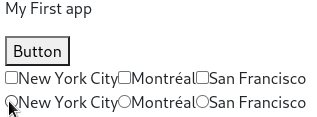
markdown = dcc.Markdown(children='My First app')
button = html.Button(children="Button")
checklist = dcc.Checklist(options=['New York City', 'Montréal', 'San Francisco'])
radio = dcc.RadioItems(options=['New York City', 'Montréal', 'San Francisco'])
# App Layout
app.layout = dbc.Container([
markdown,
button,
checklist,
radio,
])
# Run the App
if __name__ == '__main__':
app.run_server()
Dropdown
Dropdowns allow the user to select from a list of options. Similar to the checklist, we will pass in a list of options when creating the component.
We will also assign one of the list elements to the value property of the dropdown. The value property represents the dropdown option that is selected.
# Import packages
from dash import Dash, html, dcc
import dash_bootstrap_components as dbc
# Initialise the App
app = Dash(__name__, external_stylesheets=[dbc.themes.BOOTSTRAP])
# Create app components
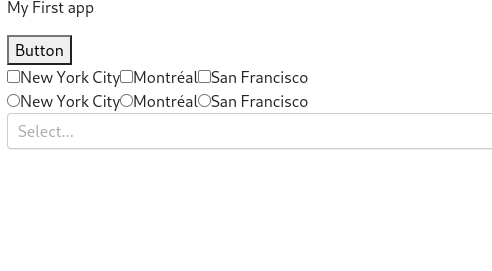
markdown = dcc.Markdown(children='My First app')
button = html.Button(children="Button")
checklist = dcc.Checklist(options=['New York City', 'Montréal', 'San Francisco'])
radio = dcc.RadioItems(options=['New York City', 'Montréal', 'San Francisco'])
dropdown = dcc.Dropdown(options=['NYC', 'MTL', 'SF'], value='MTL')
# App Layout
app.layout = dbc.Container([
markdown,
button,
checklist,
radio,
dropdown,
])
# Run the App
if __name__ == '__main__':
app.run_server()
Slider
Sliders allow the user to select a value by moving a handle. We pass in the (start, end, increment) properties to this component.
# Import packages
from dash import Dash, html, dcc
import dash_bootstrap_components as dbc

# Initialise the App
app = Dash(__name__, external_stylesheets=[dbc.themes.BOOTSTRAP])

# Create app components
markdown = dcc.Markdown(children='My First app')
button = html.Button(children="Button")
checklist = dcc.Checklist(options=['New York City', 'Montréal', 'San Francisco'])
radio = dcc.RadioItems(options=['New York City', 'Montréal', 'San Francisco'])
dropdown = dcc.Dropdown(options=['NYC', 'MTL', 'SF'])
slider = dcc.Slider(min=0, max=10, step=1)

# App Layout
app.layout = dbc.Container([
    markdown,
    button,
    checklist,
    radio,
    dropdown,
    slider,
])

# Run the App
if __name__ == '__main__':
    app.run_server()
3.2 Layout
So far, we’ve only organized our app layout in a dbc.Container() without any further specifications. We’ve seen that this will place our app components sequentially in one single column. To further customize the layout, we will use the dash-bootstrap-components library components dbc.Row() and dbc.Col(). This will allow us to define the number of rows and columns in the layout as well as the exact place where Dash components should appear (Markdown and Slider in our example).
# Import packages
from dash import Dash, dcc
import dash_bootstrap_components as dbc

# Initialise the App
app = Dash(__name__, external_stylesheets=[dbc.themes.BOOTSTRAP])

# Create app components
markdown = dcc.Markdown(children='My First app')
slider = dcc.Slider(min=0, max=10, step=1)

# App Layout
app.layout = dbc.Container([
    dbc.Row([
        dbc.Col([
            markdown
        ], width=6),

        dbc.Col([
            slider
        ], width=6)
    ])
])


# Run the App
if __name__ == '__main__':
    app.run_server()

Note
The colors above are for demonstration purposes, you will not see them in your local dashboard
Best practices when constructing your layout using Dash Bootstrap Components:
First, define the
Container, which will contain the entire app layoutThen, inside the
dbc.Container(), define theRowsThen, inside each
dbc.Row(), define theColumnsThen, inside each
dbc.Col(), insert the appComponents
You can see from the code above that we define the width property for each dbc.Col as 6. Note that the total width of columns inside the dbc.Row() is 12. Make sure that you never assign more than 12 columns within each Row.
Let’s see another example of a layout with multiple rows and columns:
# Import packages
from dash import Dash, html, dcc
import dash_bootstrap_components as dbc

# Initialise the App
app = Dash(__name__, external_stylesheets=[dbc.themes.BOOTSTRAP])

# Create app components
markdown = dcc.Markdown(children='My First app')
button = html.Button(children="Button")
checklist = dcc.Checklist(options=['New York City', 'Montréal', 'San Francisco'])
radio = dcc.RadioItems(options=['New York City', 'Montréal', 'San Francisco'])
dropdown = dcc.Dropdown(options=['NYC', 'MTL', 'SF'])
slider = dcc.Slider(min=0, max=10, step=1)

# App Layout
app.layout = dbc.Container(
    [
        dbc.Row([dbc.Col([markdown], width=8)]),
        dbc.Row(
            [
                dbc.Col([dropdown], width = 3),
                dbc.Col([slider], width = 9),
            ]
        ),
        dbc.Row(
            [
                dbc.Col([checklist], width = 6),
                dbc.Col([radio], width = 6),
            ]
        ),
        dbc.Row([dbc.Col([button], width = 11)]),
    ]
)

# Run the App
if __name__ == '__main__':
    app.run_server()

We see there are four rows with columns of various widths which contain components. Notice that the total column width in the first and last row is 8 and 11, respectively. Having less than 12 assigned to column width is fine– just remember that the total amount of column width within each row should never surpass 12.
Play around with the
widthvalue of the column containing the dropdown and slider to see how it changes the app layout.Try to move the button to be in the same row as the Checklist and RadioItem
Exercises
(1) Add to the code below a dropdown component with the following options: ‘CA’, ‘FL’, ‘DC’. Assign ‘DC’ as the initial value of the dropdown. Save the dropdown as a variable with name dropdown1, and add it to the layout.
# Import packages
from dash import Dash, html, dcc
import dash_bootstrap_components as dbc

# Initialise the App
app = Dash(__name__, external_stylesheets=[dbc.themes.BOOTSTRAP])

# Create app components


# App Layout
app.layout = dbc.Container([

])

# Run the App
if __name__ == '__main__':
    app.run_server()
See Solution
# Import packages
from dash import Dash, html, dcc
import dash_bootstrap_components as dbc

# Initialise the App
app = Dash(__name__, external_stylesheets=[dbc.themes.BOOTSTRAP])

# Create app components
dropdown1 = dcc.Dropdown(options=['CA','FL','DC'], value='DC')

# App Layout
app.layout = dbc.Container([
    dropdown1
])

# Run the App
if __name__ == '__main__':
    app.run_server()
(2) Using the app and dropdown component you just built, add the following structure:
one entire row dedicated to the title of the app, which should be “My new app” with
width=12and center aligneda second row with two column components: the first with
width=4and aMarkdowncomponent saying “Please select a state”; the second withwidth=8and our dropdown component created in exercise 1
See Solution
# Import packages
from dash import Dash, html, dcc
import dash_bootstrap_components as dbc

# Initialise the App
app = Dash(__name__, external_stylesheets=[dbc.themes.BOOTSTRAP])

# Create app components
title_ = dcc.Markdown(children='My new app', style={'textAlign': 'center'})
markdown_ = dcc.Markdown(children='Please select a state')
dropdown1 = dcc.Dropdown(options=['CA','FL','DC'], value='DC')

# App Layout
app.layout = dbc.Container(
    [
        dbc.Row([dbc.Col([title_], width=12)]),
        dbc.Row(
            [
                dbc.Col([markdown_], width = 4),
                dbc.Col([dropdown1], width = 8),
            ]
        )
    ]
)

# Run the App
if __name__ == '__main__':
    app.run_server()

Summary
In this chapter we learned about several useful Dash components and how to organize them in a layout. In the next chapter we will learn how to create an interactive app by linking the components together.